Thursday, March 24, 2011
Wednesday, March 23, 2011
Tuesday, March 22, 2011
Monday, March 21, 2011
Sunday, March 20, 2011
Saturday, March 19, 2011
Hoc Wireless Network
Do you want to create a quick network connection between two computers or laptops to share some files? Or maybe you want to share an internet connection? Windows 7 and Vista have a build-in feature to create a quick ad hoc wireless network connection, this means you can connect directly with another computer or laptop without the need of a router.
To begin, click Start and select Network. Now click on Network And Sharing Center as shown in the screenshot below. If you can’t find Network, then type Network in Start Search and hit Enter.

Now in the left sidebar, click Set Up A Connection Or Network. From the list select Set Up A Wireless Ad Hoc(Computer-To-Computer) Network option and click Next.

Click Next again and it will ask you to type a Network name and select the Security settings as shown in the screenshot below.

Make sure you select a good password, if you don’t know which security type to select, click on Help Me Choose link next to it. After you are done click Next and the Network connection will be ready.
Now in the Network And Sharing Center you can choose what to share as you can see from the screenshot below.

To Share an Internet Connection, click View Status next to the connection that you want to share. Now click on Properties button which you will find under Activity.
Click on the Sharing tab and tick the checkbox where it says Allow Other Network Computers To Connect Through This Computer’s Internet Connection. Under Home Networking Connection select Wireless network Connection and click OK.

Now your connection is ready to to shared. To enable the wireless network connection you just made, go to Start and click Connect To.

You will see your wireless connection listed there. Select your connection and click Connect.

You will see a success message as shown below.

You will see your connection listed under Wireless Network Connection on the other computer. Simply connect from there and you are done sharing the internet connection.
Note: To connect successfully make sure the wireless hardware is enabled on both computers or laptops.
To begin, click Start and select Network. Now click on Network And Sharing Center as shown in the screenshot below. If you can’t find Network, then type Network in Start Search and hit Enter.
Now in the left sidebar, click Set Up A Connection Or Network. From the list select Set Up A Wireless Ad Hoc(Computer-To-Computer) Network option and click Next.

Click Next again and it will ask you to type a Network name and select the Security settings as shown in the screenshot below.

Make sure you select a good password, if you don’t know which security type to select, click on Help Me Choose link next to it. After you are done click Next and the Network connection will be ready.
Now in the Network And Sharing Center you can choose what to share as you can see from the screenshot below.

To Share an Internet Connection, click View Status next to the connection that you want to share. Now click on Properties button which you will find under Activity.
Click on the Sharing tab and tick the checkbox where it says Allow Other Network Computers To Connect Through This Computer’s Internet Connection. Under Home Networking Connection select Wireless network Connection and click OK.

Now your connection is ready to to shared. To enable the wireless network connection you just made, go to Start and click Connect To.

You will see your wireless connection listed there. Select your connection and click Connect.

You will see a success message as shown below.

You will see your connection listed under Wireless Network Connection on the other computer. Simply connect from there and you are done sharing the internet connection.
Note: To connect successfully make sure the wireless hardware is enabled on both computers or laptops.
Labels:
Network
Friday, March 18, 2011
How to Configure DNS Conditional Forwarders
One of the things that you will find different in Windows Server 2008’s DNS is how it displays Conditional Forwarders. Previously you needed to view the Forwarders tab in the DNS server’s properties. Here is shot of the old way.

The new way is in plain site…but it still seems like people miss it.

Now here is a look at what type of options you have for it:

You just place the DNS domain name in the top section and the IP address of the DNS server that is authoritative for that domain below. Notice you also can store this Conditional Forwarder in Active Directory if you want. It is not the default. Behind that drop down is the amount of time the DNS server will wait before it times out…which is 5 seconds by default.
Hopefully that helps you figure out how DNS Conditional Forwarders are set up in Windows Server 2008
Labels:
Microsoft Forefront TMG
Thursday, March 17, 2011
Configuring outbound access rules
We’ll begin by logging on to our TMG console, and browsing down to the firewall policy.
- Right-click Firewall Policy, scroll down to New, and over to Access Rule.

- As with most things Microsoft, this will launch a wizard. Our first step is to name our access rule. I like short, descriptive names, and I prefer CamelCase to make things readable and easier to script later, so I will call this AllowAllOutbound and then click Next.

- The default action is to deny. As we’re looking to permit all, we need to click Allow, and then click next.

- The next screen is where we need to define the traffic for this rule. Again, our choice is pretty easy based on our goal, “All outbound traffic” and then we click Next.

- The next step has us decide whether or not to enable malware inspection for this rule. This may be a bit confusing, as we’re dealing with an outgoing rule, but the help file defines this as “Outbound inspection refers to HTTP requests that originate from clients on networks protected by Forefront TMG.” This is not going to inspect the replies. So if you want to be a good citizen of the tubes, and you acknowledge that your client might have picked up the e-flu somewhere along the way, enabling this could protect the rest of the world from an infected client. We’ll tick the Enable option and then click Next.

- Now we need to define the source of this outgoing traffic we’re allowing. Assuming you want to cover all your users, click Add, expand Network Sets, and choose All Protected Networks, which will include your TMG server(s), your internal clients, and your VPN clients. Click to add them, then click Close, then click Next.

- In this step, we’re defining just where we want to permit this outgoing traffic. Since we’re trying to implement ip any, click Add, expand Network Sets, and choose All Networks (and Local Host.) Add them, click Close, and then click Next.

- Since we want this to apply to all users, click Next.

Labels:
Microsoft Forefront TMG
configure Forefront TMG to block AD users from accessing internal resources
The secure socket tunneling protocol (SSTP) allows Web users authenticated by the Forefront UAG portal to access the published remote network. You can use Forefront TMG on UAG to configure who has access to what over SSTP VPN. In this example, we’ll block a specific user/group from accessing the entire Internal network on all protocols. You can also select specific protocols to block.
Note: You have to have a working AD with the previously defined users/groups to who you want to deny SSTP services connection.
Procedure:
1. Open the Forefront TMG Management console:
2. Right-click the Firewall Policy mode, select New, select Access Rule.
3. Give the rule a name, such as SSTP Block, and click Next.
4. On the Rule Action page, select Deny, and click Next. When rule conditions are met, access will be denied.
5. On the Protocols page, select All Outbound traffic, and click Next.
Note: This is the point in the procedure where you can choose a more granular approach – specify protocols you want to block.
6. On the Access Rule Sources page, click Add, and from Networks, select VPN Clients.

7. Click Next.
8. On the Access Rule Destinations page, click Add, and select Internal from the list of Networks, and click Next.
9. On the User Sets page shown below we’ll actually configure what we’ve set out to do – block specific users. Select All Users and click Remove.

10. Click Add, and on the Add Users dialog box shown below, select New. This kicks off the New User Set wizard. Name the new user set SSTP Deny.

11. On the Users page, click Add, and select Windows users and groups.

12. Browse to the right user/group, confirm it with the picker dialog, and close all of the dialogs. Click Next and complete the New User Set wizard.
13. Back in the New Access Rule wizard User Sets page, you can select the new user set, click Next and Finish to finalize the rule. You’ll also have to click Apply in the Forefront TMG console.
Remember, Forefront TMG rules are ordered, so if this rule is not near the top and another rule has these conditions and allows access, the request won’t even get to this rule denying access. So make sure this rule is at or near the top. You can read more about Forefront TMG access rules on TechNet.
You're done!
Note: You have to have a working AD with the previously defined users/groups to who you want to deny SSTP services connection.
Procedure:
1. Open the Forefront TMG Management console:
2. Right-click the Firewall Policy mode, select New, select Access Rule.
3. Give the rule a name, such as SSTP Block, and click Next.
4. On the Rule Action page, select Deny, and click Next. When rule conditions are met, access will be denied.
5. On the Protocols page, select All Outbound traffic, and click Next.
Note: This is the point in the procedure where you can choose a more granular approach – specify protocols you want to block.
6. On the Access Rule Sources page, click Add, and from Networks, select VPN Clients.

7. Click Next.
8. On the Access Rule Destinations page, click Add, and select Internal from the list of Networks, and click Next.
9. On the User Sets page shown below we’ll actually configure what we’ve set out to do – block specific users. Select All Users and click Remove.

10. Click Add, and on the Add Users dialog box shown below, select New. This kicks off the New User Set wizard. Name the new user set SSTP Deny.

11. On the Users page, click Add, and select Windows users and groups.

12. Browse to the right user/group, confirm it with the picker dialog, and close all of the dialogs. Click Next and complete the New User Set wizard.
13. Back in the New Access Rule wizard User Sets page, you can select the new user set, click Next and Finish to finalize the rule. You’ll also have to click Apply in the Forefront TMG console.
Remember, Forefront TMG rules are ordered, so if this rule is not near the top and another rule has these conditions and allows access, the request won’t even get to this rule denying access. So make sure this rule is at or near the top. You can read more about Forefront TMG access rules on TechNet.
You're done!
Labels:
Microsoft Forefront TMG
Wednesday, March 16, 2011
NLB with Forefront
Load balancing mechanism
Round-robinWebserver requests from different IP addresses will be distributed among the Web farm members. The round-robin mechanism ensures that the request of the user to a Web application serviced by a Web farm is distributed evenly among farm members that are online. When failover occurs, servers that are not responding are detected, and the load is distributed among the available servers.
Cookie based affinity
Session (Cookie) based affinity is normally used to publish Outlook Web Access (OWA) from Exchange Server 200x or Microsoft SharePoint services/Servers sites. You should not use Session affinity if you want to publish RPC over HTTP(S) services or Outlook Anywhere in Exchange Server 2007 and higher. RPC over HTTP(S) is used to give Outlook clients full access to Exchange Server from the Internet. RPC traffic will be tunneled through HTTPS. With Outlook it is not possible to use Cookie based affinity.
IP affinity
With IP affinity, the web server traffic is distributed based on IP to all members of the Web farm. If one Server fails to respond, the traffic will be sent to another member of the Web farm.
You should not use IP based affinity, if remote clients are located behind a NAT server, because the web server farm will only see the IP address of the TMG Server. If this is the case you should use Session affinity, if it is possible.
IP affinity is useful in an Exchange RPC over HTTP(S) also called Outlook Anywhere scenario, where session affinity cannot be used or, in Exchange Active Sync publishing scenarios, where the client does not fully understand HTTP 1.1 (which is needed for cookie based affinity).
To create a webserver load balancing publishing rule start the TMG management console and navigate to the Firewall policy node and create a Web Site Publishing rule.

Figure 2: Start the Web publishing wizard
Name the new policy rule and allow the traffic.
Click publish a server farm of load balanced Web servers

Figure 3: Publish a server farm
Because we are publishing an internal Web server without HTTPS, specify the appropriate option.

Figure 4: Use only HTTP
Enter the internal Site name and specify a path if you want to publish the web server only to a specific path.
As the next step create a new Farm, enter the name of the farm and add the internal web servers to the Web Server farm, as you can see in the following screenshot, and specify how Forefront TMG should load balance incoming web requests.

Figure 5: Specify Farm member
Forefront TMG creates a connection verifier to monitor the availability of the farm members. If one server is not reachable an alert will be created. You can customize the alert actions and I will show you later how to do this.

Figure 6: Connection verifier
A new popup window appears and will ask you if you want to activate a system policy rule to allow HTTP requests from Forefront TMG to the published web servers. Click Yes if you want to do this.

Figure 7: System policy rule
The next step is to create the specify Listener which Forefront TMG uses to listen to incoming traffic. Because my article only focuses the Web Server farm load balancing functionality, I will only give you some more information when you publish a web server over HTTP.
Forefront TMG warns the user that the current configuration may be unsecure when authentication requests are sent over HTTP.

Figure 8: Allow a system policy rule
To allow client authentication over HTTP you must allow this in the Advanced Authentication options window in the Listener properties as you can see in the following screenshot.

Figure 9: Allow client Authentication over HTTP
After the Webserver publishing rule has been created, navigate to the properties of the rule and click the Web Farm tab to verify the correct configuration.

Figure 10: Web Farm properties
Monitoring Web Server Farm Status
If you want to know which web server farm member is available or unavailable, Forefront TMG automatically creates connection verifiers when you create the Web Server farm. A connection verifier detects the status of farm member and reports this event to the alert configuration in TMG Server, which creates notifications like e-mail messages, entries in the event log and more.Servers in a web server farm can have five different states:
Active
This is the normal state of a web server in the farm and indicates that the server is reachable and able to accept requests.
Out-of-service
This state indicates that the web server didn’t respond to the connection verifier within the specified timeout. No requests are sent to this farm member.
Draining
This state indicates that the web server is in the process of being drained. Existing connections will be finished but new requests will not be sent to this server. This feature is useful if you want to place one Server of the Web Server Farm in maintenance mode.
Removed
This state indicates that the web server has been removed from the farm, and is not accepting requests.
Unable to verify
This indicates that the server state cannot be verified.
Web Server maintenance
If you want to place one web server manually into maintenance mode navigate to the Servers tab, select the server and click the Drain button to place the server in maintenance mode so that Forefront TMG knows that this node is not available for load balancing requests. For session based affinity, the server will continue to handle current sessions but will not accept new connections. If you are using IP based affinity a drained server stops receiving requests, but existing connections to that server are still handled.
Figure 11: Servers included in the Farm
Alert actions
To configure alert actions when the Web server farm servers are not available, navigate to the monitoring node and in the task pane select Alerts properties and specify the actions you want to perform when a Server in the Web farm is unavailable.
Figure 12: Web Farm monitoring and alerting
Labels:
Microsoft Forefront TMG
Block List of Websites
One of the features in ISA Server 2006 is the ability to block traffic based on URL or Domain name. This means that traffic can be blocked for a particular website from ISA Server without disrupting the general Internet access rule.
I’ve compiled some Domain Name Sets and URL Sets from the Internet and zipped them for easy availability for ISA administrators. Download the ZIP file and extract it. Under Network Objects in the Toolbox tab, right click URL Sets and click Import. Choose a single XML file from the unzipped folder of URLs. Once you have imported all XMLs, follow the same procedure for Domain Name Sets.
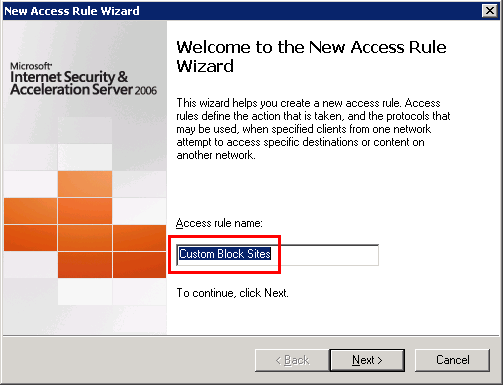
The next step is to create a rule which denies traffic to the websites which are listed in the XML files that we imported. Start by creating a new rule. I’ve named my rule as “Block Custom Sites”.

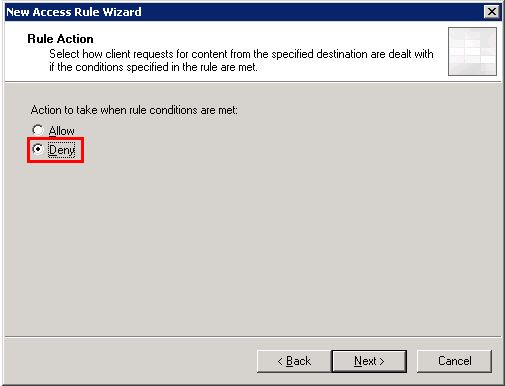
In the Access Rule, choose “Deny”.

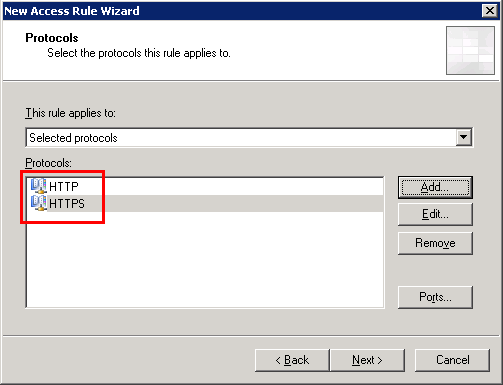
Under protocols, choose HTTP and HTTPS.

Under Sources, choose Internal and VPN Clients.

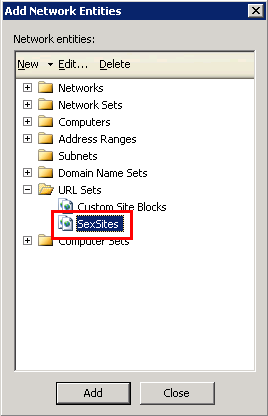
Under Destinations, choose the XML lists that we imported. You can add multiple XML files.

I’ve compiled some Domain Name Sets and URL Sets from the Internet and zipped them for easy availability for ISA administrators. Download the ZIP file and extract it. Under Network Objects in the Toolbox tab, right click URL Sets and click Import. Choose a single XML file from the unzipped folder of URLs. Once you have imported all XMLs, follow the same procedure for Domain Name Sets.
The next step is to create a rule which denies traffic to the websites which are listed in the XML files that we imported. Start by creating a new rule. I’ve named my rule as “Block Custom Sites”.

In the Access Rule, choose “Deny”.

Under protocols, choose HTTP and HTTPS.

Under Sources, choose Internal and VPN Clients.

Under Destinations, choose the XML lists that we imported. You can add multiple XML files.

Labels:
Microsoft Forefront TMG
Tuesday, March 15, 2011
Publishing Exchange Outlook Web App (OWA)
Introduction
Forefront Threat Management Gateway (TMG) 2010 includes support for publishing Microsoft Exchange Outlook Web App (OWA) for Exchange 2010, as well as Outlook Web Access for Exchange 2007, 2003, and 2000. In this second part of the article series we will walk through the steps required to publish Exchange OWA 2010 using TMG.Importing the Certificate
Before we can publish OWA, we first need to import the SSL certificate for the site on the TMG firewall. To accomplish this, click Start / Run and then type mmc.exe. From the drop down menu choose File / Add/Remove Snap-in. Select Certificates, then click Add >.
Figure 1
Select the Computer Account option.

Figure 2
Select the option to manage the Local computer.

Figure 3
In the console tree, expand the Certificates node. Expand the Personal folder, then right-click the Certificates folder and choose Import…

Figure 4
Enter the location of the certificate file you exported previously.

Figure 5
Enter the password and optionally mark the private key exportable.

Figure 6
Accept the default option to Place all certificates in the following store.

Figure 7
In the TMG management console, right-click the Firewall Policy node in the console tree and choose New, then Exchange Web Client Access Publishing Rule…

Figure 8
Give the publishing rule a descriptive name.

Figure 9
Select Exchange Server 2010 from the drop down list, and then select the option to publish Outlook Web Access.

Figure 10
For demonstration purposes we are publishing a single CAS server, so we’ll choose the option to Publish a single web site or load balancer.

Figure 11
Select the option to Use SSL to connect to the published web server or server farm.

Figure 12
Enter the name of the internal web site.

Figure 13
Select the option to accept requests for a specific domain, and then enter the public name of the web site.

Figure 14
Create a web listener for the site by selecting New…, and then enter a descriptive name for the listener.

Figure 15
Select the option to Require SSL secure connection with clients.

Figure 16
Select the network to listen for incoming web requests.

Figure 17
Choose Select Certificate… and select the certificate you imported previously.

Figure 18
Select the option to use HTML Form Authentication and Windows (Active Directory) to validate credentials.

Figure 19
If required, enable SSO.

Figure 20
The authentication method used by TMG must match the authentication method configured on the web site. Since we enabled basic authentication on the web site, we’ll choose Basic Authentication here.

Figure 21
If you wish to grant access to OWA only to specific users and/or groups, add them here. Otherwise accept the default All Authenticated Users group.

Figure 22
To confirm operation, click the Test Rule button.

Figure 23
TMG will test the rule and report the success or failure accordingly.

Figure 24
Labels:
Microsoft Forefront TMG
Subscribe to:
Posts (Atom)
